Aaron's Blog -
Mesh selection and why it matters!
Why is mesh selection so important?
Many printers only give consideration to the mesh count, and ignore the other crucial components of mesh selection. Screen printers who utilize static screens are not given the option from their screen supplier to select the best mesh count, thread diameter, % of open area, or theoretical ink deposit for their particular application. Often this data is not available or is missing for the average printer who buys static (non retensionable) screens from a supplier. This compromises the quality of the print, and ultimately lowers the resale value of your product. We utilize retensionable Newman roller frames, and a selection of static frames that we stretch in house in order to control all of the screen variables. We evaluate all of the characteristics of the mesh before its ever stretched to make a screen. By controlling these variables, we provide a better print, and ultimately greater value for our customers.
The Nitty Gritty
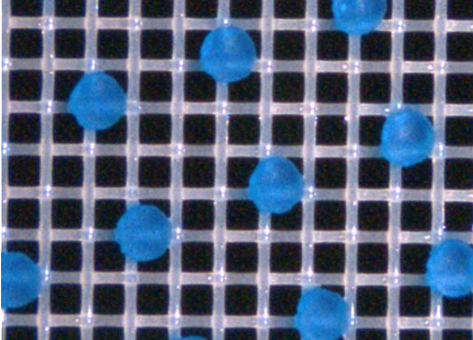
When considering mesh selection for underbase screens, many printers only give consideration to the mesh count. The mesh count, represents the number of threads over one square inch. A 110 mesh screen will have 110 threads in a 1″ space. A 305 mesh screen will have 305 threads over a 1″ space. The more threads per inch, the higher the mesh count and the more detail you can achieve with that given screen. The trade off with increasing detail is opacity, since there are more threads per inch, there is a smaller open area for ink to pass through. This results in a print with higher detail, but less opacity or “brightness”.
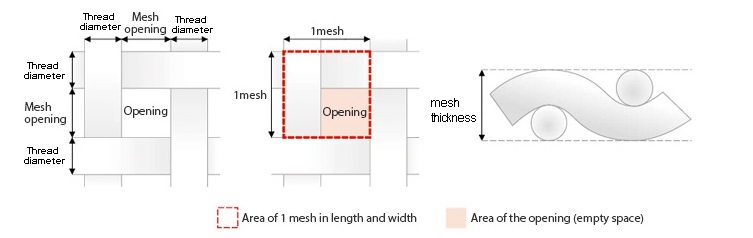
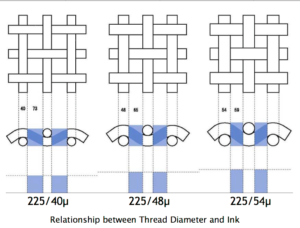
This brings us to the often overlooked component to mesh selection. Thread diameter. It is a misnomer to only represent mesh count. Thread diameter is equally, if not more important. A 110 mesh screen is not just a 110. It is a 110/80 or a 110/71. A 305 is not just a 305, it is a 305/40 or a 305/34. The second number, represents the thread diameter in microns.
A 110/80 mesh screen contains 110 threads per inch, has a thread diameter of 80 microns and a 41% open area.
A 150/48 mesh has 150 threads per inch, a thread diameter of 48 microns and a incredible open area of 51%!
In addition to the mesh count and thread diameter, the open area of screen mesh is also a critical factor when determining ink deposit. A mesh with the proper open area %, should be used for the art that is being printed!
Practical Application:
The thinner the thread, the easier it is to clear the ink from the mesh. When it is easier to clear the ink from the mesh, we can print using high speed and low pressure. When you can print a opaque plastisol ink with low pressure and still get great ink clearance, that is a beautiful thing. The ink provides better opacity as it sits on top of the garment (as intended) rather than being smashed in. Since less ink is needed to do its job, you get a high opacity print with less of a hand, resulting in a better all around print. Plastisol ink should sit on top of the garment, not be smashed into it with
great force. The thicker the thread, the more force is required, either in screen tension or squeegee pressure. Thinner threads also help when printing waterbased or discharge ink. WB and discharge ink need good penetration into the fibers of the shirt to encapsulate the entire fiber and achieve good results. Thin thread mesh, with its high open area % provides much better penetration of the fibers than a standard T (thick thread) mesh.

While both a 150/48 and a 230/48 mesh screen can handle the detail of this 6pt font, the best option is to utilize a thin thread mesh to achieve better ink clearance, and higher opacity.
So what are the trade offs? This is the real world therefore trade offs are to be expected. Many shops who use thin thread mesh don’t stick with it. Why? Well, to begin with thin thread mesh is more difficult to source, and it is more expensive than standard mesh. In addition, thin thread mesh is inherently weaker and more susceptible to mishandling. We use special handling techniques and use special tools for ink removal and reclaim to avoid damaging the sensitive mesh. If proper techniques and reclaiming procedures are used, thin thread mesh has great longevity. Often the production manager of a shop will try thin thread mesh, while neglecting to train employees on proper handling. After 5-6 expensive screens are popped in one day they switch back to their “better” mesh. But is is better to have a sub par base screen that results in lower quality? I think not! It is not only beneficial for simple spot color images, but it’s almost imperative if you want to achieve high end prints on the more demanding fabrics that we see in the market today.
After consideration and testing of various mesh counts, thread diameters, and tension levels, we determined to only use thin thread “S-Mesh” at moderate tension (22-27N) for our base plates. We have done extensive testing and have found that thin thread mesh, in particular 135/48, 150/48, and 225/40 provide us with the best base screens. Our 135/40 screens can hold 6% dots at 50 LPI! That is a physical impossibility on a 110/80. And the 135S has a 55% open area, compared to a 110/80 that has a 45% open area. Normally, I like to use higher line screens for halftones, this can easily be achieved on a 150/48 or 225/40 screen. We hold 8% dots at 60LPI on a 150/48 screen. To better hold tonal ranges for high LPI sim process jobs, 225/40 or even 350/30 screens are employed with incredible results. The value of being able to get an opaque white, while at the same time holding high LPI halftones cannot be overstated.
A good understanding of screen mesh can go a long way. Not only for the printer, but also the designer and purchaser of printed apparel. Understanding the print variables in advance of artwork design will better equip you to make choices that provide you with the best product possible. With thin thread mesh, we can do more with less. Often the need for a highlight white or print / flash / print methodology can be eliminated so long as tight control of variables such as screen tension and EOM, (stencil thickness) are tightly maintained. If you want to know more about better designing your art to take advantage of thin thread technology, drop me a line and I’m more than happy to help!
Waterbased Inks Explored
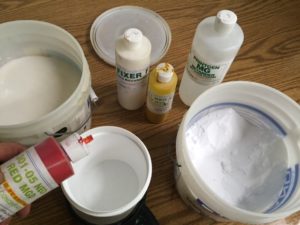
Waterbased inks use water as the main solvent, and may also contain co-solvents and binders which can be petroleum based. The main purpose of these solvents are to carry the pigment, and control the cure rate of the ink film on the garment. Waterbased inks are used primarily on light colors, while discharge or HSA (high solids acrylic) inks are used for darks. Discharge inks are waterbased inks which contain a ZFS activator (zinc formaldehyde sulfate) of a certain percentage. This activator discharges the dye from cotton fibers, the pigment in the ink then replaces that dye with the pigment. The binder acts to bind the pigment into the garment.
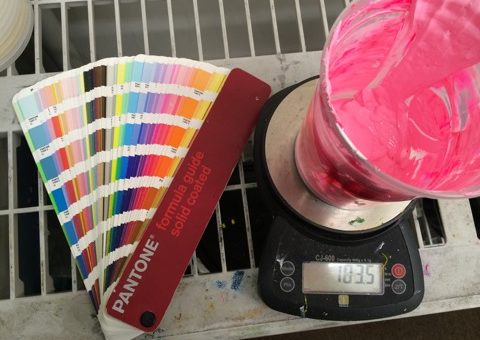
Very bright and opaque colors can be achieved with waterbased and discharge inks, this in conjunction with the limited “hand” or feel of the print, makes this ink system very popular for garments that are sold in a retail setting. With discharge systems, Pantone color matching is often problematic and inconsistent. Due to the different dyes used by garment manufacturers, it is very difficult to match pantone colors to a high degree of accuracy, not all garments discharge the same. In addition, there can be variation between lots of shirts even when using the same style from the same manufacturer at a later date. Redyed shirts from manufacturers are not uncommon, and contribute to this issue greatly. This can make it difficult to run a reprint of the same art with exact color accuracy.
Certain garment colors and brands do not discharge well, and since discharge activator only works on cotton fibers, 50/50 blends and triblends do not discharge nearly as well as 100% cotton garments. With that being said, some very interesting effects can be made when you use a discharge ink on a blended shirt. With any ink system, testing is key to achieve the desired results. If you are wanting to use discharge ink on garment colors such as blue, purple green, or any blended garment, you should anticipate a bit more time for testing.
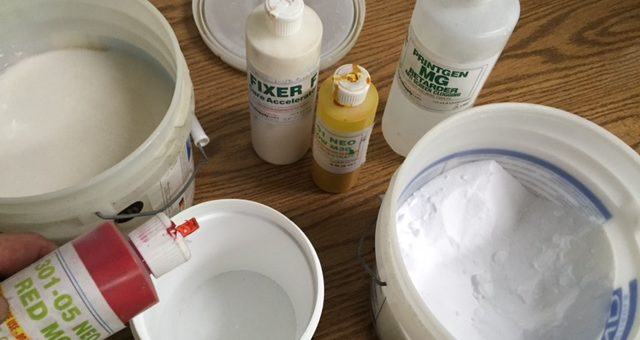
The ink components are often lower in price when compared to plastisol ink, however the cost per print is often more, due to the testing, additional time required for mixing, and extra documentation for each ink blend. In addition, hardeners are needed to strengthen the stencil on the screen, as the inks are very hard on emulsion. Since waterbased inks use water as a solvent, they also have the ability to dry in the screen. Some printers will use lower mesh count screens for this reason, the end result is detail limitation. This is a poor trade off, since the proper use of retarding additives and thin thread mesh, high LPI halftones can be easily achieved. But only when good materials, techniques, and planning are employed.
Often it is advantageous to utilize multiple ink systems and use discharge ink in conjunction with plastisol. Printing a discharge underbase, with plastisol top colors can give you a very thin ink deposit, with a soft hand and great detail. This combination technique works especially well with process and simulated process printing on soft rungspun garments.
Every piece of artwork is unique, and requires a high level of skill to get the best result. There are advantages and disadvantages of every ink system. The more you know about each system and the substrate it is being printed on, the better you can plan your artwork and garment selection to achieve the results that you want.
Let’s Talk Plastisol Ink
Plastisol, as discussed in our blog post, ink systems overview is the most common ink used to screen print textiles in the apparel industry. It is well suited for light and dark fabrics. It’s also well suited for a multitude of fabric blends and man made materials when formulations and catalysts are matched to the material. So today, let’s talk plastisol and discuss some of the things we can do with it.
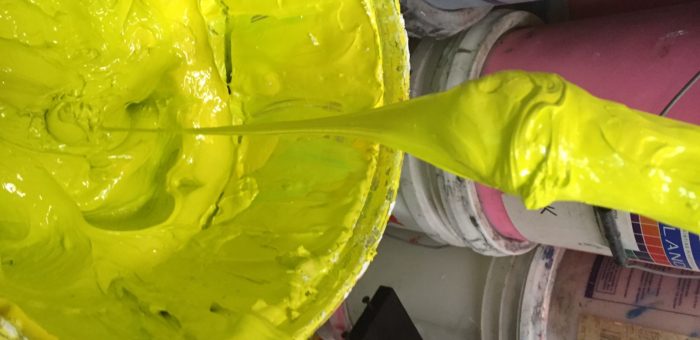
Most plastisol is comprised of a base containing a plasticizer and a PVC resin. It is thixropic in nature, meaning it thins when sheared during the printing process. Pigments are carried by the base, sometimes referred to as the vehicle, in a suspension. When cured at around 320-330F, the plasticizer and PVC resin fuse and the ink creates a mechanical bond with the fibers of the garment. This creates a vibrant, opaque, extremely durable and long lasting print when cured correctly. In many circumstances, the print will outlast the life of the garment. When the artwork is properly separated, plastisol can often be printed wet on wet, which results in high production speeds. The viscosity and opacity is readily modifiable allowing for a wide range of print possibilities. Modern plastisols flash dry quick at around 280F and have a low after tack. This allows the printing of top colors quickly; as opposed to a waterbased or discharge ink, where the water has to be dried out first. This causes hotter pallet temperatures, which negatively effect the subsequent print colors.
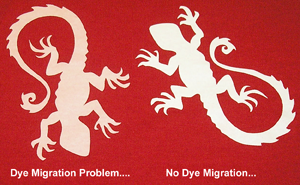
Polyester, and their blends, require special consideration regardless of ink system. Low bleed plastisol ink allows us to print on cotton / polyester blends, as well as cotton / poly / rayon (triblends) and 100% polyester garments. Polyester fabric has a tendency to both subliminate and outgas around the same temperature that plastisol ink cures. This poses certain challenges that must be overcome in the ink chemistry. Low bleed inks contain dye blocking agents, along with agents that lower the cure temp to reduce sublimation. These inks are more expensive due to the chemistry of the ink, but are mandatory to prevent dye migration. A classic example is the red 50/50 blend, printed with white ink which turns pink 24-48 hours after printing. This happens as the dye migrates from the polyester fibers to the ink layer. Dye blocking, low bleed inks help mitigate this risk, but are not always fool proof. For 100% polyester, especially digital camo or garments that are known to be bleed happy, we will utilize a silicone based ink.
Since plastisol inks do not dye the fabric, but rather create a mechanical bond and sit on top of the garment fibers, the resulting print does have a “hand.” The “hand” is the term that we use to describe the feel of the print itself. If there is a very large print area, like a stop sign for example, the “hand” can be very noticeable. Having a large sweat patch on your garment is in no way desirable by the end user, especially when printed on a lightweight shirt. Enter the world of additives. An additive such as “soft hand base,” does exactly what the name implies. It softens the hand and in high ratios increases the translucency. Alternately, curable reducer is a thinner which reduces the thickness of the ink itself, while also reducing opacity. Ink additives, in addition to proper mesh selection and the use of highlight white screens, drastically reduce the ink deposit and the hand of the print. In the case of a simulated process print, a halftone underbase is usually used rather than a solid spot underbase, which makes for a very nice, soft hand print even with many overprint colors.
Sometimes the application calls for a different type of additives:
- Puff additive can be used to create 3D puff effects; when designed into the artwork this can be very fun, especially for kids.
- Photophosporent additive can be mixed in or printed as a stand alone ink for a glow in the dark effect.
- Nylobond allows us to print on substrates that plastisol would not ordinarily bond to, such as nylon. This is extremely useful for umbrellas, nylon bags, and windbreakers. Nylobond also lowers the cure temperature, preventing dye migration on some substrates and allowing the printing of polypropylene materials.
- Shatter base, can create a unique tattered, cracked and worn look, while still providing excellent adhesion and durability.
- Stretch additive can be used to more easily print on spandex blends.
- Suede additive can be used as either as a dulling paste for a matte finish in lower concentrations, or in higher concentrations for a suede or leather effect
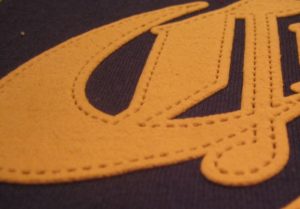
Here is a useful example of great artwork, plastisol ink, and some suede additive. With planning, the artist and screen printer were able to create a visual that mimics a leather patch.
There are dozens of other additives available that can be used to enhance any print.The availability of additives make plastisol one of the most versatile, consistent, and useful ink systems for textiles. When additives and specialty inks are thought about ahead of time and incorporated to the design, results can be stunning.
Some examples of specialty inks:
- Reflective ink, contains millions of microspheres suspended in the base, which when hit with a beam of light, reflect that light back to its source hundreds of feet away. This has been very popular with construction workers, runners, and anyone wanting to be seen at night.
- High density inks can be employed to create 3D effects, standing as much as 1/8″ off the surface of the garment. This is great for solid spot colors.
- Metallic, shimmer, and glitter inks are fairly self explanatory, and are commonly used in screen printing.
As you can see there are many benefits to using plastisol ink, and when handled and disposed of properly they are even considered to be very environmentally friendly. They emit no VOCs, and contain no evaporative solvents that pollute the air. In addition, many plastisol inks on the market are now phthalate free. Quality inks are not cheap, therefore very little is ever left on the screen. Since they never dry in the air, they can be cleaned out and reused. Any remaining residue can be cleaned up with soy based solvents, filtered, and the solids cured into a block for safe disposal. In this way, plastisol is one of the most eco friendly inks on the market.
As new garment materials and innovative blends make their way into the marketplace, plastisol will continue its evolution to meet the demand of this ever-changing industry. When used in conjunction with the proper mesh, print parameters, and variable control, plastisol is amazing. Countless award winning prints have been created with this ink system, and millions world wide use and wear it every day.
An Overview of Textile Screen Printing Inks
Screen Printing is a very versatile print process. If there is a flat surface, It can most likely be screen printed. A major consideration for any job, is the ink system to be used for a given material, or substrate. For this blog post, we will be focusing on textile applications. With the goal being an increased understanding and awareness of the abilities, applications, limitations, and economic factors that different ink systems provide.
Plastisol
Plastisol ink has been the staple ink for the garment printing industry for many years, so it makes good sense to start here. Plastisols are non water soluble and they must be heated to cure. Therefore they do not dry in the screen and are easy to work with on press. They are very opaque on dark garments, and are relatively simple to color match using pantone mixing systems. There are a wide variety of additives available which provide an enormous amount of flexibility. In addition, many special effects can be achieved using plastisol inks. Plastisol inks are well suited to a number of garment types and blends which make it a very versatile ink system. Its consistency and repeatability make it the go to ink for printers around the world. The ink components are generally more expensive than waterbased or discharge inks, but due to the printability and ease of use, plastisol is generally the most economical and cost effective ink for the majority of the apparel industry.
Waterbased and Discharge inks (HSA)
Waterbased inks have been growing in popularity recently, and for good reason. When printing waterbased inks, the ink is driven into the substrate, rather than sitting on top of the garment as with plastisol. Waterbased inks provide a very soft hand, after washing the garment will have very little to no hand. Waterbased ink is especially great for heavy nap fabrics such as towels where you want a soft surface. When cured properly, the ink will last for a very long time. Discharge inks are waterbased inks that utilize a ZFS (Zinc Formaldahyde Sulfoxylate) activator and work on 100% cotton fibers to remove the dye from cotton threads. For this reason, discharge is best used on dark 100% cotton garments. Testing is key when printing with WB and discharge inks, especially with blended garments. Waterbased inks are more difficult to mix, and while the ink components may cost less than plastisol, the time it takes to mix the ink, the requirement for hardened emulsions, and the on press characteristics of the ink make discharge a more expensive ink system in the majority of cases.
Silicone Ink
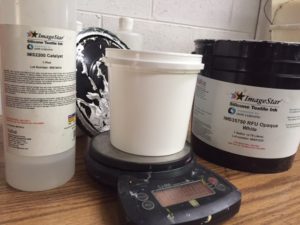
Of all of the ink systems, silicone ink is the newest. It was developed by Dow Corning in recent years to combat some of the limitations of plastisol when printing on 100% polyester garments. Polyester garments are heat sensitive, and they don’t like to hold on to their dye when heated. Sublimation and outgassing occurs near the cure temp of plastisol, which causes dye migration from the garment to the ink layer. For years low bleed plastisols have been employed often with less than optimal results. Silicone ink is quickly changing the way performance apparel is printed. Pantone colors are easily matched, dye migration is avoided, and the hand of this ink is unlike any other on the market. With more and more performance, moisture wicking, and synthetic blended materials coming onto the market, high performance ink is required. The high cost of the raw ink components do make it one of the most expensive ink systems that we use on garments. It is a catalyzed ink, so it has a limited screen life once mixed. This is one of the reasons that small batches become uneconomical to print with this system. Mid and large print runs are quite affordable when the ink cost is spread out over a larger number of garments.
The Keys to Success
Understanding the substrate, the ink systems, and a general knowledge of the print process is a must if you want to take your garments from good to great. As with anything, there are many ways to achieve the desired outcomes. The more that is understand about inks, garments, and the screen process in general, the more you are empowered to make great decisions when creating art, choosing blanks, and determining what ink is best for you needs. In future posts, we will explore each ink system in a more in depth way.

Tips for preparing art files in PS.
When preparing raster (pixel) based images for screen printing, it is important to follow some basic guidelines. First make sure that you start with good, high quality images at the proper resolution and size. The default resolution for most images that you will find on the internet is 72DPI. This is great for quick loading images on the internet, but if you try to use low resolution images for output, the results are almost always going to be sub par. The final output quality can never be any greater than the original source file, so it is essential to start with quality images a the outset. If you are using photographs in your artwork, consider taking your own pictures at a high resolution (300DPI min) using a quality camera and appropriate settings for lighting. You can always stage your photos to make eliminating an unwanted background easy. We will get to that in a moment, but first lets talk more about sizing. When working with raster images, it is important to keep it at print size. When you scale a raster image many times, it will dither as the computer makes up any information that is missing on the enlargement. This creates sawtoothing and pixelation, throughout the image. This is especially noticeable on hard edges and lines. This distortion will translate to the film positive, to the screen, and eventually to the garment itself, so I cannot emphasize enough how important the proper resolution and size is when working with pixel images. An easy way to check in PS is image > size. If it is at 72 DPI in resolution, you should find another image to work with. If you simply change the resolution setting from 72 to 300DPI, the compute will make up the missing information, which will cause dithering. Below, you can see an example of a low resolution image with sawtoothing.

We complete our separations for the press in Photoshop, using color channels. For this reason, it is helpful to have your artwork on a transparent layer with a separate background layer for the shirt color you want to print on. You can erase your background in a number of ways. One of the best is to use the magic eraser tool set to a low tolerance. You can also go to select > color range > ok using the appropriate tolerance. Once selected use the delete key to remove the background. If for some reason, your background layer is locked, you can simply duplicate the locked layer and keep the original in case you need to go backwards. You’ll know you have a transparent background when you have a checkerboard pattern around the edges of your artwork. You can then add a new background layer and fill with the appropriate shirt color. Make sure your layer order is correct, and the shirt color is at the bottom of the layers menu. 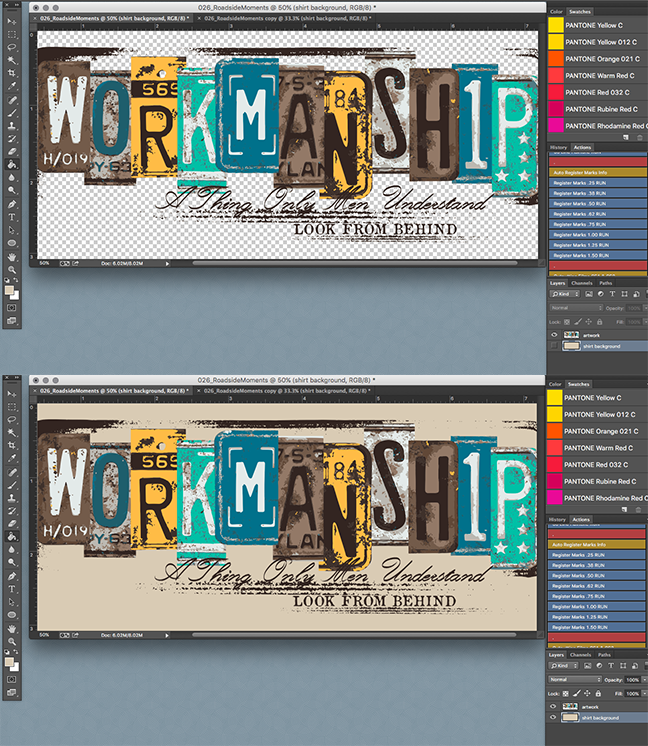
Now that you have a transparent background, you can add add text, vector elements, apply layer masks, gradients, filters, distressed effects etc. The sky is the limit, but do not make the mistake of flattening the layers in your image, this will make it impossible to move any design elements since you have essentially pasted your art onto a white sheet of paper. Keep the transparent background and instead use “merge visible” in the layers pane.
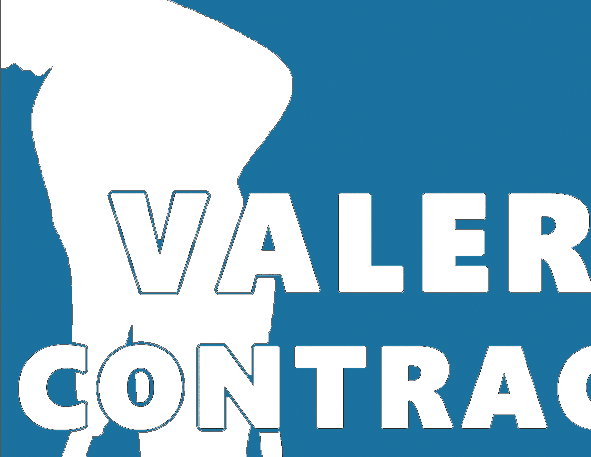
It is also important to consider the weave of the fabric in mind when creating artwork for screen printing. Very course materials such as towels, do not take well to fine detail, on the other hand very tight knit ringspun garments gold excellent detail and can hold very thin lines and crisp halftone dots. However it is recommended not to use text under 12pt, or to use lines that are thinner than 1pt. If in doubt, you can measure a line in PS by using the ruler tool. Another place where art can cause problems on press, is when there is too thin of a negative space between a large area of color. In the example below, there should be a larger “stroke” of color around the white ink to be printed. If this is not addressed during art creation, or prepress, the negative space will close up, as most ink systems on fabric tend to gain and spread out on the surface ever so slightly.
Once you are happy with your artwork, be sure to delete any unused layers and double check it for accuracy. If you have text layers in your file, you should rasterize the type layers by selecting the type menu > rasterize type layer. This is done to avoid font compatibility issues. Not all computers will have the same fonts installed, so be sure to rasterize your font to avoid any unintended errors or substitution. You can now save your file as a .PSD file and upload it using our order form here.
This is certainly not an all inclusive guide to PS, but by following some basic good practice procedures you can help us streamline your order, avoid errors, increase quality, and decrease turn time. If you’d like to get specific recommendations about your artwork, feel free to drop us a line so we can help.
Recent Comments