Print Process
Screen Printing is a stencil based print process. Modern screen printing combines digital technology with proven "analog" technology to create your final product. Screen printing (also known as silk screening) is one of the oldest methods of printmaking. Many trace the screen process back to the Song dynasty in China, however historian and author Guido Lengwiler writes that the early processes in China hardly resemble what we consider modern screen printing, and the growth of the industry as a whole can be more attributed to the massive demand for printed felt pennants in the early 1900s. The industry later moved towards other substrates as patents on the process expired and knowledge spread with more advanced inks and technology. Screen printing is widely considered one of the most versatile print processes as it allows you to print on a wide variety of substrates. You'll often find screen printing used to print textiles, rare and collectible posters, real estate and political signs, packaging containers, and even some circuit boards and mirrors!
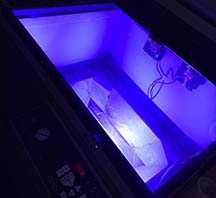
The first thing we do is take your artwork and separate out the colors. Since each color is printed using its own screen, we separate out the colors and then output each color to a to film positive using a large format inkjet printer in conjunction with a special driver called a RIP (raster image processor) which is used in creation of the screen. We calibrate our positives for density and dot gain using a transmission densitometer. Our clean, properly tensioned screens are coated with a photopolymer or dual cure emulsion, and then allowed to dry in a humidity and temperature controlled dark room. Once dry we use the film positive to create your screen. The positive is placed onto the screen in "pre registration" with the other colors. We then expose the screen to UV light using our exposure unit for a predetermined amount of exposure, depending on the type of emulsion, screen coating method, color, and mesh count of the screen. Our exposure unit is equipped with vacuum blanket to ensure that the film positive is 100% flat against the screen. This ensures crisp detail and along with our single point system prevents "light scattering". The film positive blocks UV light from exposing the areas which are printed to the film. Once exposure is complete, we rinse out the screen using a pressure washer. All of the areas that were not exposed to light washes out which creates the stencil that we will use to print the design.
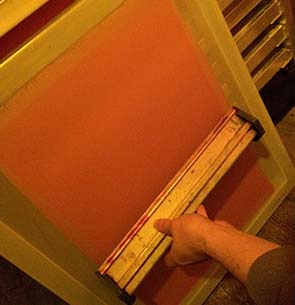
Once the stencil is washed out, it is allowed to dry. Once dry we move the screen down the line to our prepress area. We tape any areas not covered by emulsion. We check for proper stencil washout with a 10X loupe and check for proper stencil thickness over the mesh. This is done for each screen. Each color is then registered to the positive, and then to a test print. Usually ink is mixed in advance to improve workflow, but inks requiring catalysts such as silicone, discharge, or nylobond are mixed immediately before they are needed due to the shelf life of the additives. If pantone colors are designated, we carefully check for accuracy. Once the test print is completed we move onto the production phase if the test print is satisfactory.
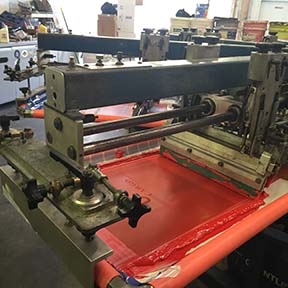
Production here can be a one, two, or three person job depending on the quantity and other variables. When operating the automatic press, it is most efficient to have a loader, unloader / press operator, and a catcher to fold and count shirts off the dryer. Once the print run is complete, we clean the screens and squeegees of ink using screen wash, remove the tape from the screens, and then they are set aside to be reclaimed and reused. We monitor tension levels on our screens after reclaim, and retention to spec as soon as it is needed, in order to better control one of the most important print variables. For quality purposes, We do not save screens for customers, however we do save film positives in a folder, along with the proof, job sheet, and printed sample one year from the last production date. Artwork and color separations we save indefinitely on our server.
That is the basic print process in a nutshell. With that being said, there are many more processes, techniques, and elements that are often incorporated. Halftones, simulated process, four color process and index printing all have their place in our shop. Check our our blog, for further information and details on the most up to date processes, techniques, and methods.